
 Every couple of days I see a site that inspires me to think about a new design. I'm the kind of guy that (left to my own desires) would change his theme every week. But my site goals are readability and the development of trust, and you can't do that if you keep changing what your site looks like and where you can find content.
But there's another reason why I don't change my theme framework – and that's because I find that almost anything I want to do can be done using the Catalyst Theme, which I run here on chrislema.co. Don't get me wrong – I love all the other frameworks that I write about and I use them all on projects too. But every time I have a little idea, Catalyst seems to be ready for me to test it out.
But first…a word about my Hosting Provider
Before I get into this bit of code, I want to remark again how awesome it is to be hosted on WP Engine. This time, I'll just tell you that before I learned of their staging area, I'd never had a host provide me with something similar. In fact, on many hosting solutions, I would often buy another domain and set up another account, just to play with code on the same environment.
I could go long into why local testing only covers part of the dynamics and why testing your changes on the actual environment is critical, but that's for another time. Instead let me just say that I was able to test all all of these tweaks on chrislema.co and that is one more reason I love WP Engine.
Today's Catalyst Tip – Email Sign Ups
So, if you're reading this, you can see that I've placed an email sign up on the right side, in an orange box. That was really simple and required work at all. But here are the steps:
- Log into MailChimp (or your hosting provider)
- Navigate to Lists
- Click on the gear and pick “Forms”
- Then look for the options under “For your web site”
- Grab Signup form embed code
- In WordPress go to Appearance > Widgets and add a text widget
- Place your embed code there and save
If I had to summarize it, I'd say, “copy the embed code for your signup form from your mail provider and paste it into the html/text widget” and you'd be set.
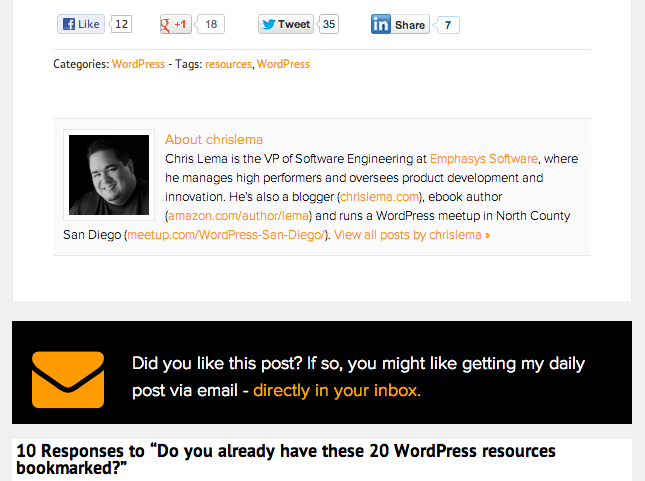
But that's not the tip I want to walk you thru. That orange box signup form has been there for a while. No, instead, I want to talk to you about the other one, below, just above the comments, in the black box. See it down there? Go ahead, scroll a bit and check it out – I'll still be here when you get back.
Placing a Sign Up Below Single Posts
The great thing about Catalyst is that it understands you may need to do some complex things but it keeps them simple. So let's get started.
The first thing to note is that I am going to use a “hook box.” If you've never heard of a hook box, it's the Catalyst way of saying, I'm going to attach some code somewhere on the site, basing it's location on an existing “hook.” Catalyst has created a set of hooks that helps you in this case.
Step One: Create a Custom Hook Box
You create a custom hook by going to the Catalyst > Advanced Options > Custom Hook Boxes. Now, you click on the Add Button and it gives you a blank hook box. Go with me here, even if you're not exactly clear on what we're doing. I'll explain.
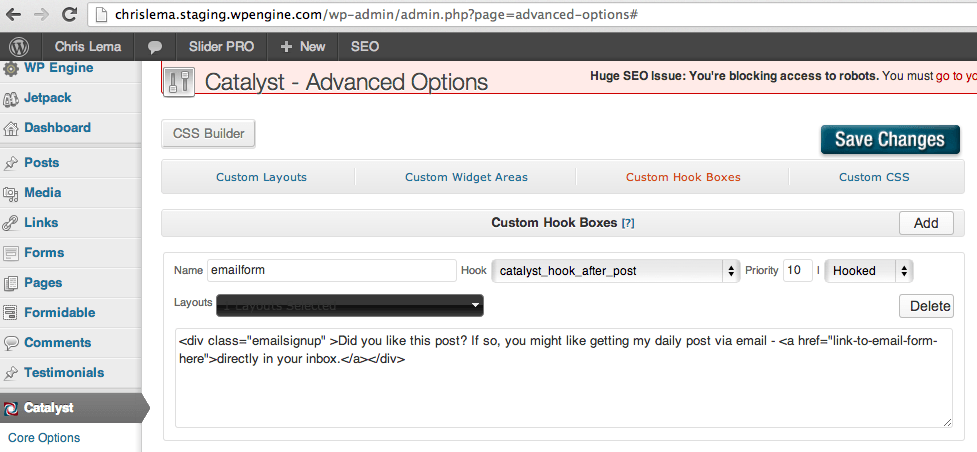
In the name, put something like “emailform” and in the open box below, let's add our code.
<div>Did you like this post? If so,
you might like getting my daily post
via email -
<a href="link-to-email-form-here">
directly in your inbox.</a></div>
That is the code that you're planning on adding to your site. It's a regular
Step Two: Tie the Hook Box to a Hook
There's a Hook drop down on the form. Catalyst provides a huge list of hooks. Not that you need it, but if you want, you can see the whole map of hooks right here. What we're going to do is tie it to the one we care about, which comes after the post (since we want it after a post and before the comments).
Pick: Catalyst_Hook_After_Post – this is the one you want. But also make the Priority: 1. This puts it first out of anything that may be using this hook.
Once you do this, you'll see that it shows up at the bottom of the post before the comments. Yeah!
But wait? It also is showing up between excerpts on any archive page. And we don't want that!
Step Three: Conditionally Show it
Don't worry. We're going to use a conditional to only show it when we're actually reading an article. When we're reading an article, the view we're looking at is often called the “single page” because we're not looking at a list of posts. So WordPress itself has a filter for that, and Catalyst will let us use it. Here it is:
php if ( is_single() ) { ?>
That code says, “hey, only do what's next if we're looking at a single page.” So that's what we have to do – wrap our earlier code with this conditional statement. And when your code is complete, you need to end the conditional reference. So that means you should go out later and add this code at the bottom.
php } ?>
What we've done is limit when the hook box displays anything. Here's what it looks like live on my site.
Conclusion
Of course you can do more and go further from here. You can style the div, the link, and even the text. But the trick for me was using a hook box effectively. And Catalyst makes it really easy.
I don't have the data yet on how effective it is to have the sign up in both places but the last couple days it's gone well. If you do it, come back and let me know how it went.