
Introduction
There's never been a better time to create a membership site than right now. We saw the big jump in both membership sites and online courses in 2020 from COVID and the trends suggest this will continue this year and into the next. And while there are many platforms to choose from (SaaS and plugins for WordPress), today I'm going to spend less time helping you pick the right one, and more time explaining how to create a membership site with WordPress. It will take 10 steps, no more, and no less. So let's get started.
Step 1: Getting Started
Before you start with WordPress, you need to make a hosting decision. And not all hosting is the same. So my suggestion will always be to pick a host that can answer your questions specifically about membership sites. Most will tell you they have a great platform for WordPress but when you ask about caching and having tens, hundreds, or thousands of concurrent users for a membership site, things start breaking down quickly.
Nexcess was designed for high concurrency membership sites, and today you can get a plan for $9/month (which is insane!). I recommend it more than any other hosting because I've been behind the scenes with many hosts and know how things fall apart with high traffic membership sites.
Step 2: Choosing the Right Plugin
In today's example I'm going to show you how to do everything with Restrict Content Pro, one of the many membership plugins I've reviewed and the one that delivers tons of great features at the best price – meaning the value is high for you.
Specifically, you'll notice when we get to step 10 that there are some situations that other plugins can't handle – making RCP a great choice.
Step 3: Setting Up Your Membership Plugin
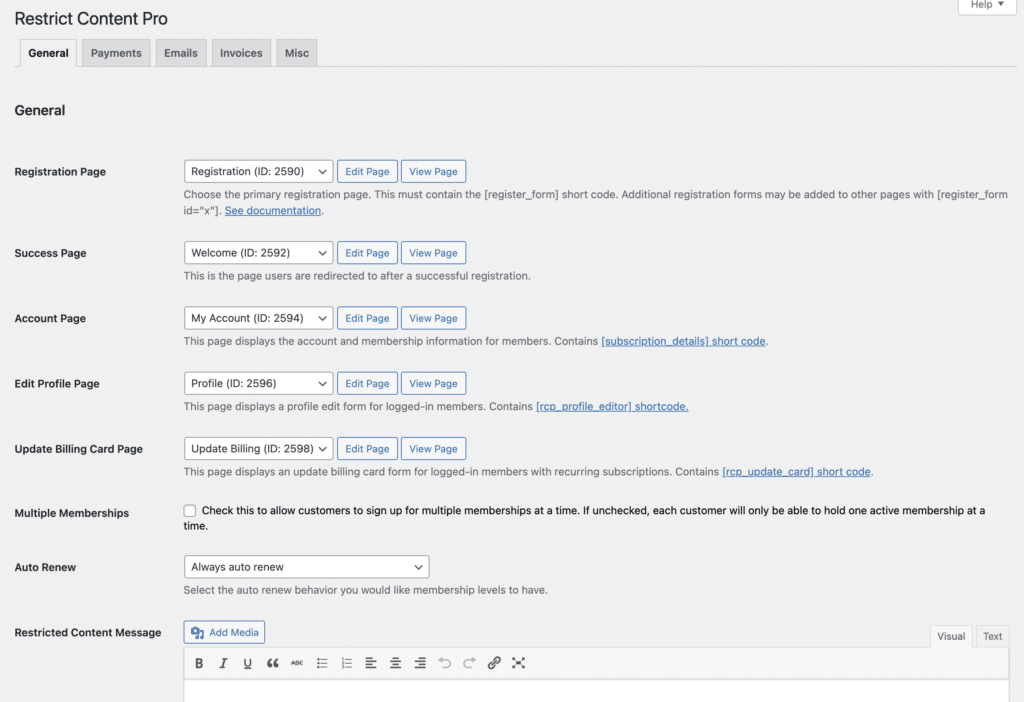
When you first install and activate the plugin, you're going to want to visit the WordPress admin and look for Restrict > Settings.
That's where you'll find the settings page for RCP. The first page, General, is where you'll make sure all your critical pages are mapped. In other words, you want to make sure that you have a Registration page, a Success page, an Account page, and places to edit the Profile and Billing.
These pages are automatically created for you, and the shortcodes are placed on the page. But if you want to change them, the General page is where you'll make those mapping changes.
You don't have to worry about the other tabs for now, except to mention the Misc tab.
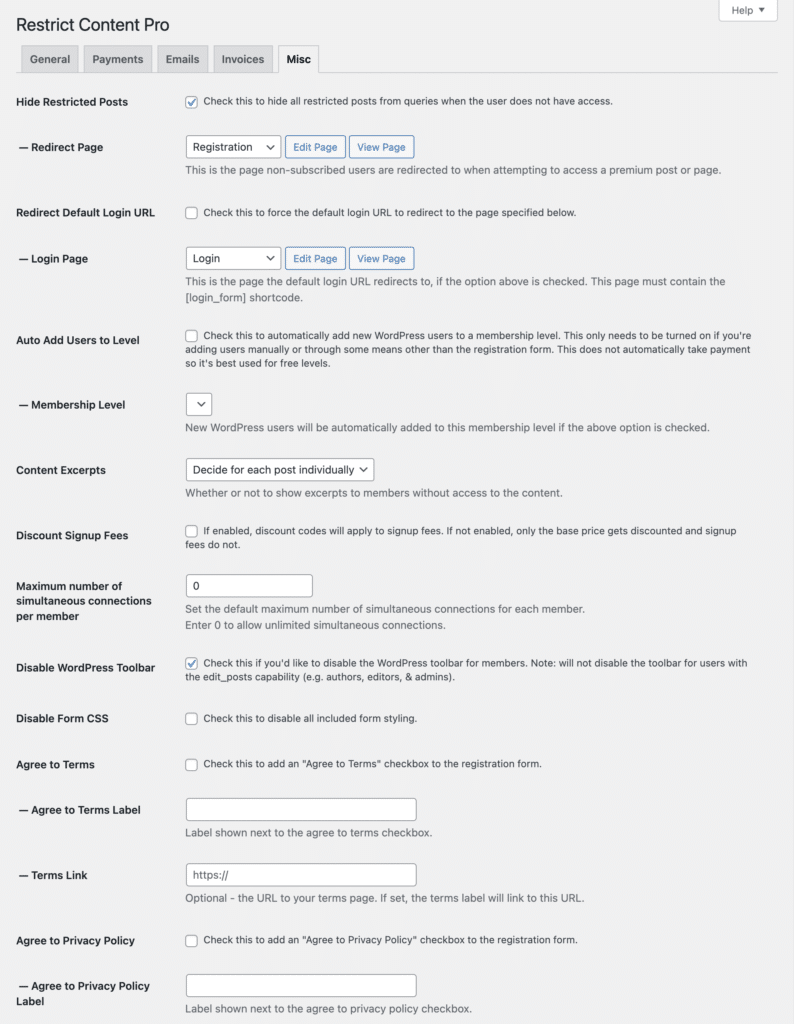
This is the other “settings” page that you will want to look over. There are two pages that you'll also want to map here – the redirection to where people can go to sign up page, and the login page.
Most of the rest of the defaults are fine, but if you have specific terms and conditions, and privacy policy pages, you'll want to link them up here.
We'll hit the other settings pages later (step 6 and 9), so don't worry about them right now.
Step 4: Adding Your Membership Plans
When we're talking about how to create a membership site, the previous steps feel like the precursor. Step four is where we start actually building a membership site.
Whether you call them membership plans or membership levels, this is where you create the different options you provide to customers.
You'll navigate to Restrict > Membership Levels to create these membership plans.
You really have four decisions to make for each level, but RCP gives you even more options than that.
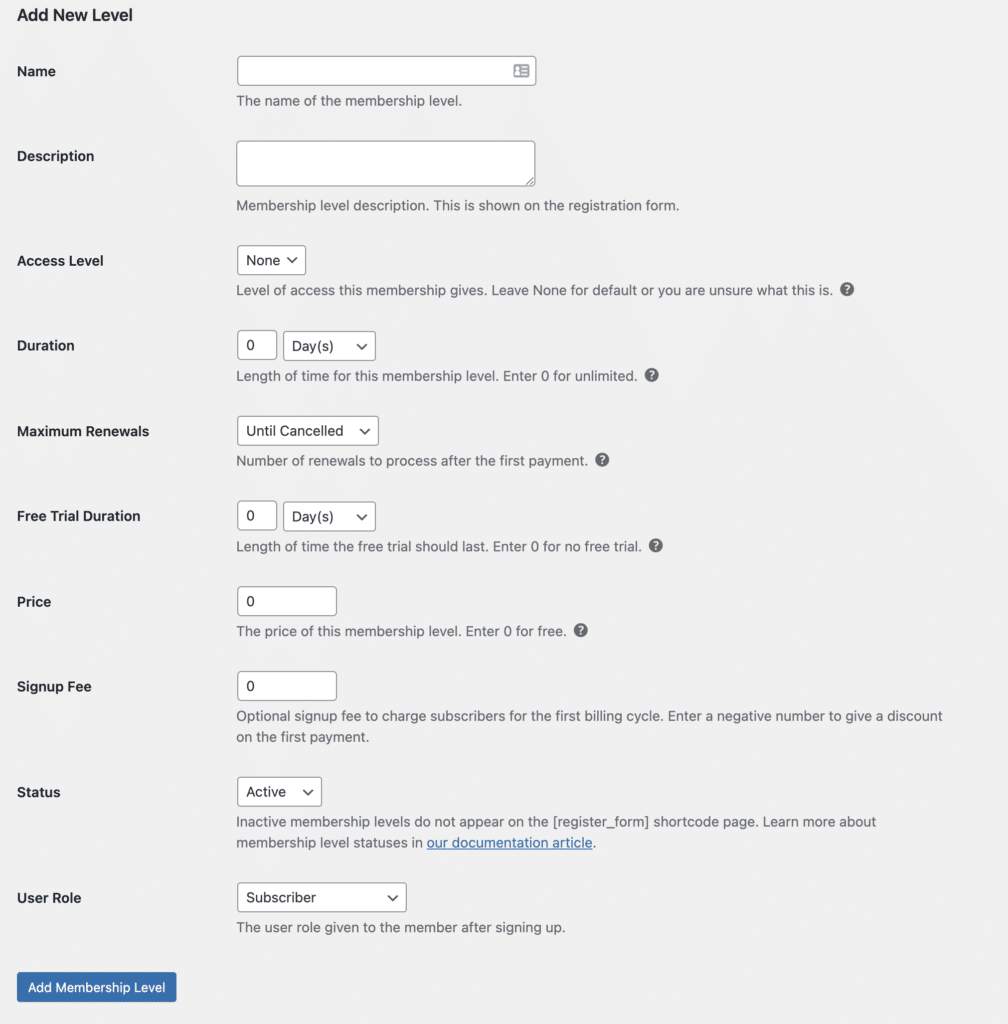
The four decisions are Name, Duration, Free Trial and Price. But as you see above, RCP gives you even more fine-grain control of each membership plan.
- Name – What you will call this plan
- Description – The brief description of the plan, displayed on the pricing page
- Access Level – You will rarely need this (part of an older WP approach)
- Duration – Pick your billing period
- Maximum Renewals – Most will leave this as “until cancelled”
- Free Trial Duration – You'll have to choose if you want to offer a free trial
- Price – This is the price charged per period of your duration
- Signup Fee – An additional fee charged at the start
- Status – Normally set to Active
- User Role – The role you put people in after they sign up
You'll want to create one level for each plan you're creating.
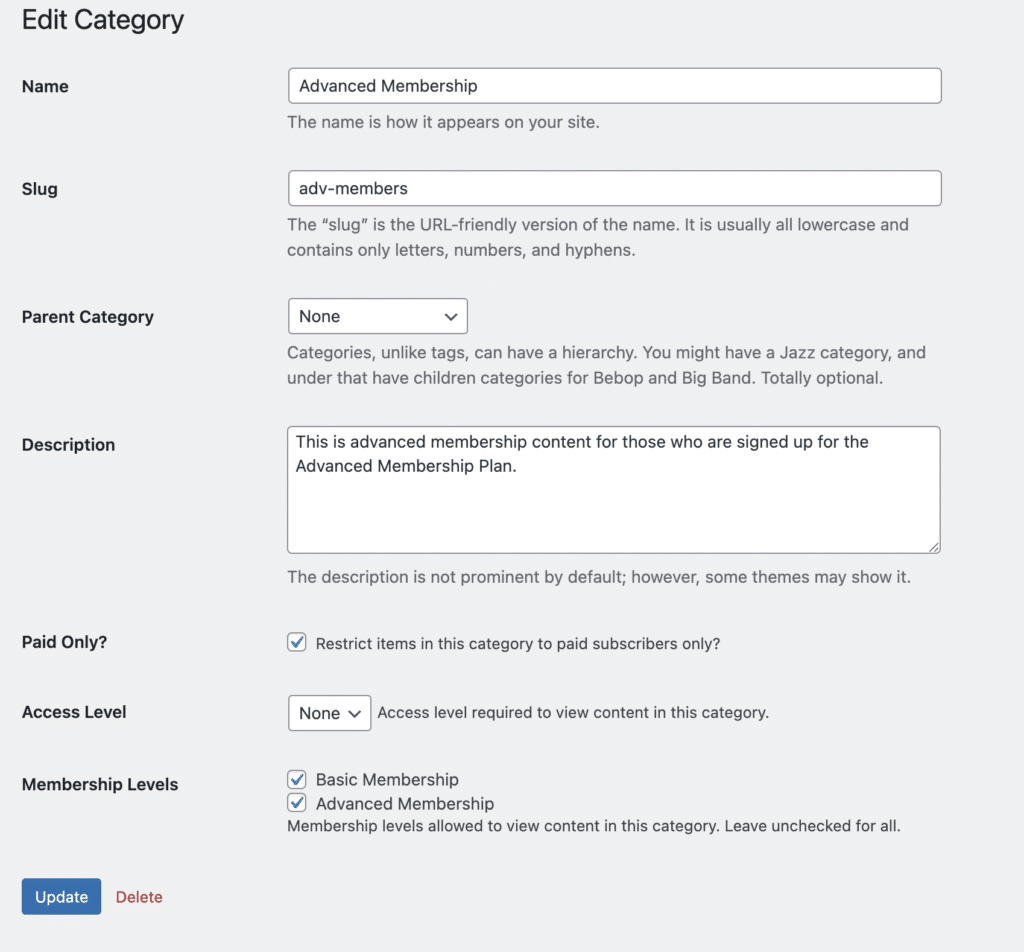
Step 5: Protecting Your Content
The whole reason you want to learn how to create a membership site with WordPress is because you want to protect some of the content on your site. And that's what you do in step 5. This screenshot (below) is what appears when you create categories for your posts that will map to your membership plans.
Step 6: Configuring Payment Methods
Congrats! We're past the halfway mark. Now it's time to work on getting you paid. This is actually a pretty simple step but I like to break it out into its own step because it will often require that you go offsite to collect information that you'll need.
The top half of the screen is pretty easy. You're simply picking which payment gateway you want to use. Note that if you're not using Restrict Content Pro, you'll likely need to get, download or purchase the payment gateway add-on (as most membership plugins offer those extensions separately).
You find this screen by going to Restrict > Settings and look for the Payments tab.
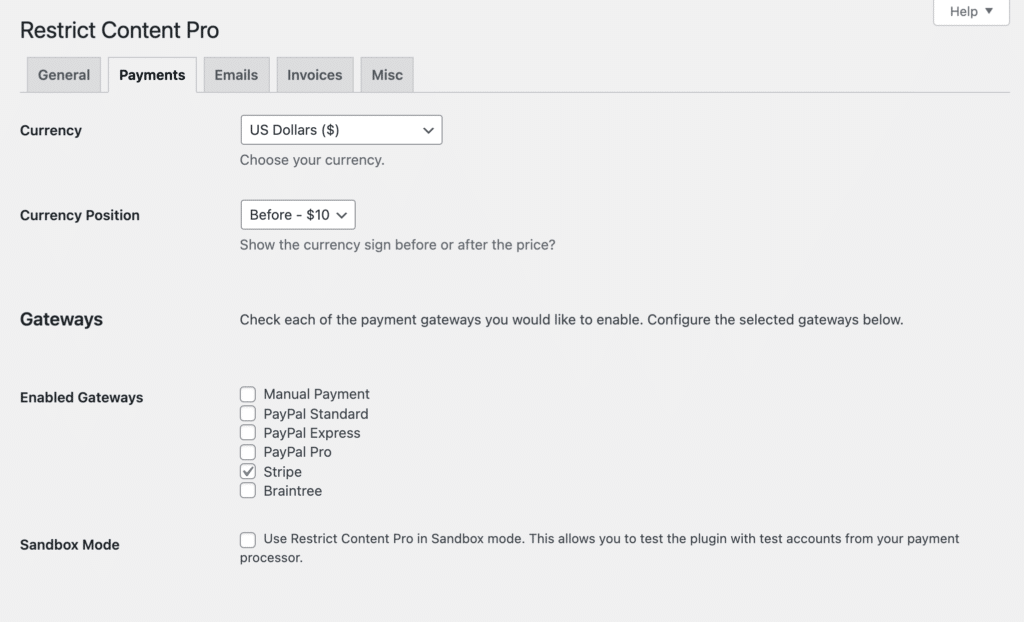
The second half of the screen is where you need to put in your keys and credentials. What I can tell you is that the links on the page make it easy and in some cases where you need documentation, the links are there for you too.
Step 7: Creating the Pricing Page
Here is the good news. If you've done everything right so far, your pricing page will be already completed for you. (But I'm not suggesting you leave it as is.) You have a Registration page. It has a shortcode on it. And you created plans, and now configured payments. So when you visit that registration page, it will look like this.
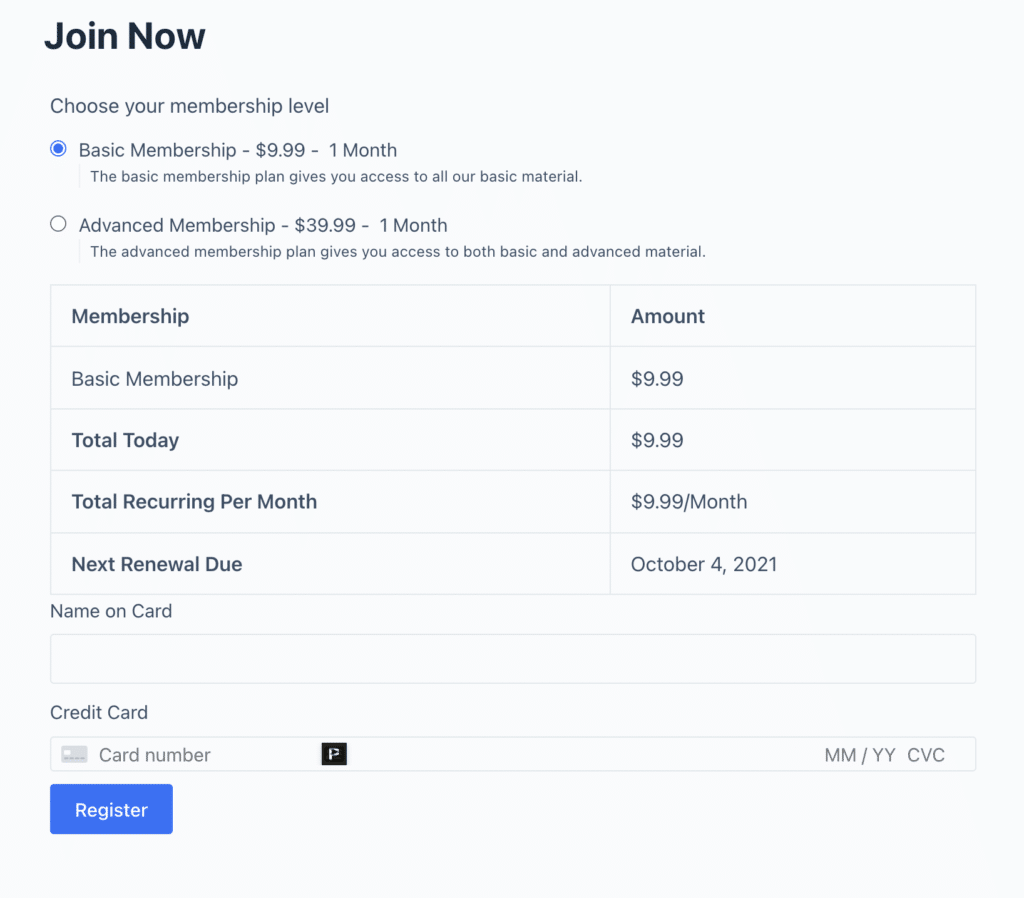
You have to love that everything is already there and ready for you. It means you can start selling right away (once you have members-only content).
But like I said, I suggest you put a little more work on this page. There's marketing copy to put above and below this, along with testimonial material and everything else you need to create a compelling reason to sign up.
Step 8: Creating Members-Only Content
You remember step five where you created categories to hold members-only content. What if you want to protect pages as well as posts? The good news is that it's really easy (as you see below).
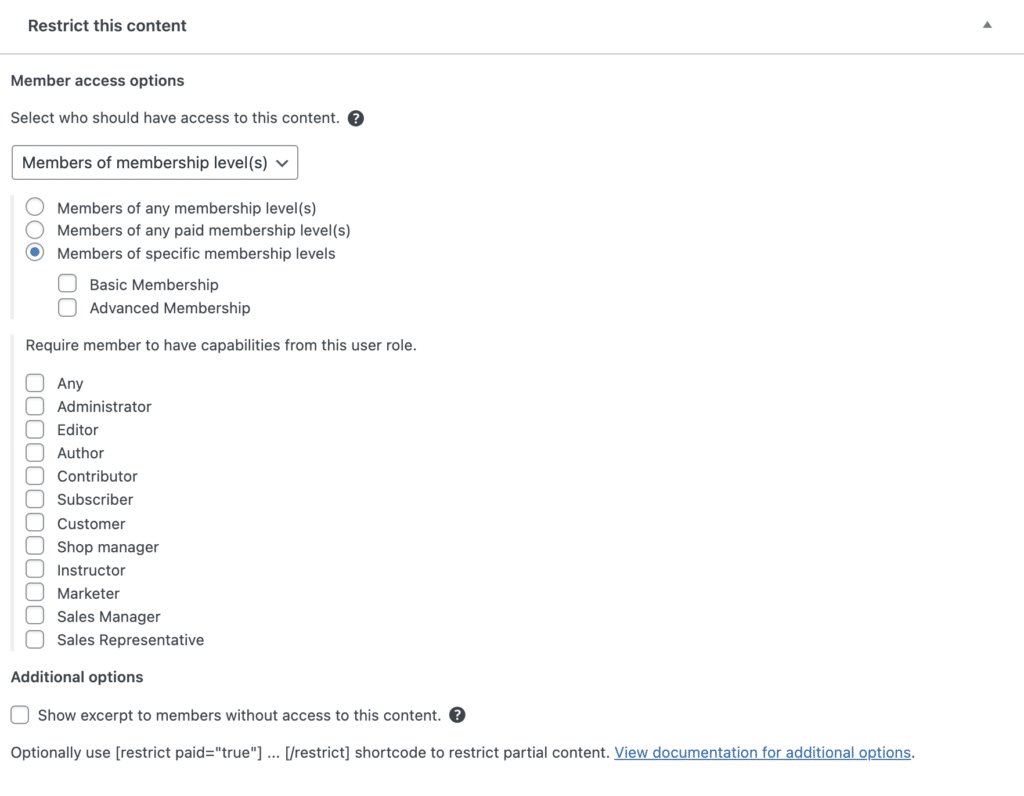
This appears at the bottom of every page you create. So pick membership level from the drop down, and then members of specific levels, and finally the level you want.
This approach means you have control over every page and post on your site. All you really need to do, to call this step complete, is load in your private content.
Step 9: Integrating Marketing Automation
Remember when we started setting up RCP? There was a tab for emails and I told you not to worry about it. Now is when I tell you that I think you should skip emails that WordPress will send out and instead integrate a marketing automation solution.
RCP has support for ActiveCampaign, MailChimp, and others. But my favorite is their integration with ConvertKit.
If you do integrate with a marketing automation solution, then you would go to Restrict > Settings > Emails and mark all the “check to disable” checkboxes.
Why? Because you don't want to send the emails twice.
Once you check them, you can configure those emails to be sent from your marketing automation solution since you'll add a tag to the customer who signs up (like a “basic-member” tag), and then you can put them into automations for welcome emails, payment reminders and more. When the tag is removed because of cancellation, you can pull them from one set of sequences and put them into another.
If you choose to not integrate with a marketing automation solution, then now is when I would tell you to go back to the Restrict > Settings > Emails and configure everything there.
Step 10: Special Cases (Team & Historical Access)
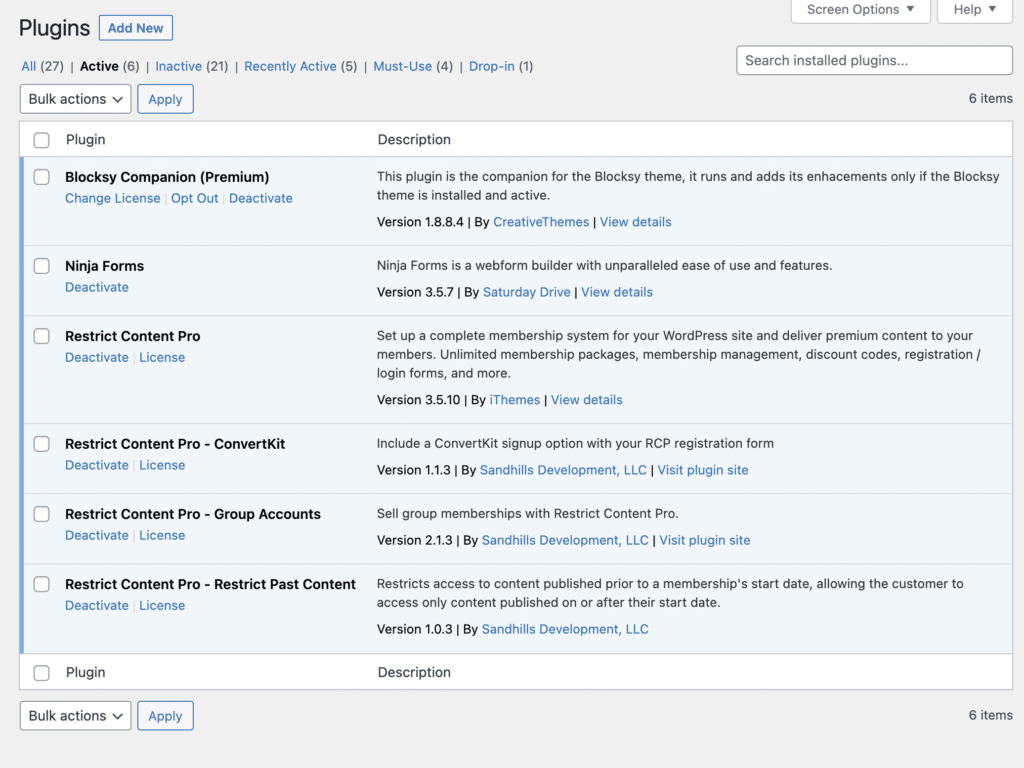
At the start I told you that RCP handles some things that other membership plugins don't do as well. Two of those are team access and historical access.
The team access is called Group Accounts and I wrote about it this past summer.
Historical access is called “Restrict Past Content” and like it says in the description above, it allows you to charge customers separately for content that was published before they signed up. I find this to be one of the essential features of membership programs.
Both of these features are available via pro add-ons from Restrict Content Pro.
That's How to Create a Membership Site with WordPress
So there you have it – the ten steps that you need to follow to create a membership site. It's not as hard as folks make it out to be. Honestly the hardest part is content creation. But once you have that down, this stuff is pretty straightforward.
Of course I'm always around if you have questions.