
 Let's say you ran a hobby store, a nursery, or a similar retail shop. You've been told you need to get online, but you're not sure how to go about it.
A recent question came in about using an online store to let people place orders – without doing any actual transactions. The scenario would go like this.
- Customer goes online to view everything.
- Customer selects and item, but only when there's enough inventory in the store.
- Customer then picks it and claims it, which removes it from inventory.
- Customer then prints an order form and brings it into the store.
- Customer then pays and takes the item away.
And the question was pretty simple: is this possible in WordPress? Well the answer is a resounding YES and I'm going to show you how to do it all for $50 in 5 steps.
1. Start with WooCommerce
I'm sure you can start with another e-commerce platform out there, as there are many good ones, but in this case, I'm going to show you how to do it with WooCommerce, a free plugin for e-Commerce on WordPress.
Simply download and install the plugin, like you would any other.
2. Turn on Inventory
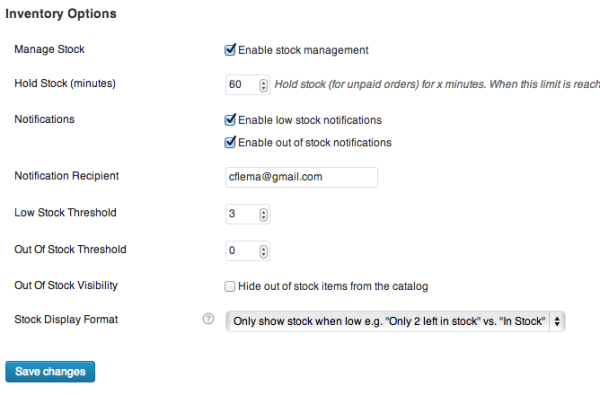
The person asking the question was clear that they needed inventory support. Thankfully, WooCommerce does this for you automatically. So all you need to do is turn it on. To do this, go into WooCommerce > Settings and look for the Inventory tab.
Turn it on, and head to the link for Inventory Options, so you can configure the screen (which should look like what you see below).
 3. Add Inventory levels on your Products

After that, to track inventory, you need to make sure that you've put the quantity into the product definition screen while setting them up.
 What this does is track inventory for each product, allowing you to be notified when inventory gets low. It also lets you display this info on the screen for prospective customers if you've set it up in the last settings section.
4. Configure Shipping Options
I know it's crazy to think about local pickup as a shipping option, since no shipping is happening. But that's how it works – since local pickup is an alternative to shipping. So we'll be heading over to WooCommerce > Setting to look for the Shipping tab.
But before we do that, we're going to buy a WooCommerce extension. Now, you could use the default local pickup feature. But this extension gives you some added functionality.
With it, you can charge for this service. With it, you can set up multiple locations for pickups. With it, you can set certain categories of products to all be local pickup only. Since it's the only item we have to pay – $50 seems like a pretty nice deal.
It's called Local Pickup Plus.
Once you've installed it, you'll want to turn it on. So like I said, head over to WooCommerce > Setting to look for the Shipping tab.
First, turn shipping on. Then pick the local pickup that has plus as part of its method id.

Once you do that, you can click on the link that takes you to details for Local Pickup Plus.

One of the upsides of using this extension is that you can hide shipping address collection – because it's not used or useful. I love removing items that just make the user spend more time on things that aren't needed.
5. Now set up Payments
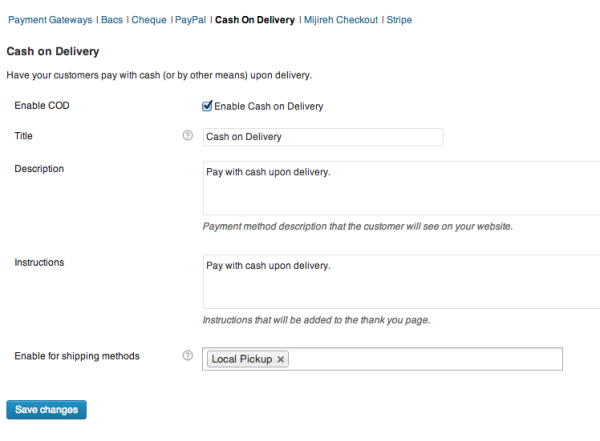
With inventory and shipping configured, the last part is the payment option. In this scenario, we don't actually want to charge anyone anything until they arrive at our physical store. So that means we need to set up Cash on Delivery. Again, not a payment gateway per se, but that's where we go (WooCommerce > Settings > Payments).
 In the above image, you can see that I have both credit card and cash on delivery activated, but credit card as my default. You could just make cash on delivery the default by selecting the radio button.
Click into “Cash on Delivery” in the sub-menu to activate it. Then head down to the shipping options and make sure you scope the setting for just local delivery (plus). If you do that, then the only time Cash on Delivery will be available is when they're using local delivery.
 When it's all put together – Simple Offline Transactions

When you get it all done, it works out exactly as planned.
First, we look at a product – with inventory showing.

Then we put it in our cart. Notice the local delivery is defaulted. When we go to check out, notice the cash on delivery option.
 And finally, we see the order (receipt) that we'd print and take with us to the store.

And that's what I call #donedone.