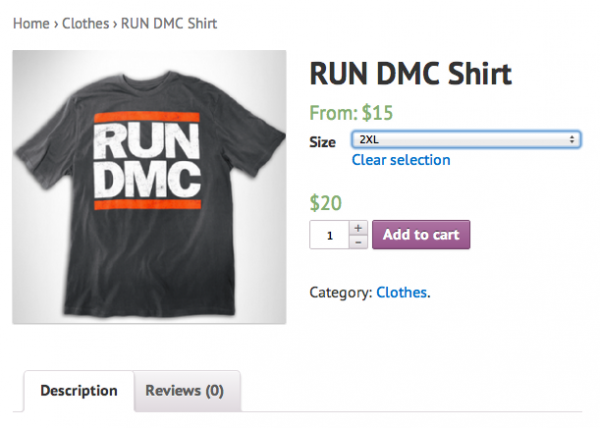
If there is a topic in the WooCommerce realm that seems more complicated and confusing than it really is, it has to be variable pricing. I'm not sure why but if I had to take a guess, it'd be because the terms “variable” and “variation” are both used in the context of attributes. Maybe that's where the confusion comes from. Nevertheless, WooCommerce variable pricing is a pretty easy thing to make happen. Before I walk you thru the steps, let's look at the final result. Here's what we're going for.
Notice the Increased Price?
When you look at the screen shot, do you notice that it says “from $15” as the price, and yet, when I select 2XL, the price is actually $20? That's variable pricing. I'm able to define a set of variations (small, medium, large, etc) for a particular attribute (size) and then attach a different price for one of the variations.
Start by adding an Attribute
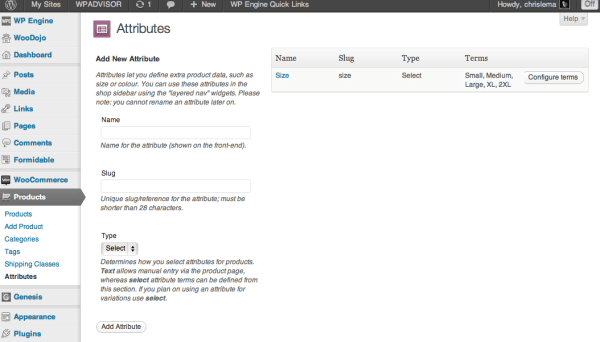
1. Visit Products > Attribute and enter a new one on the right.
Once you add something like “size”, you'll see it on the right, and you'll be able to configure the attribute options.
Configure your Attribute
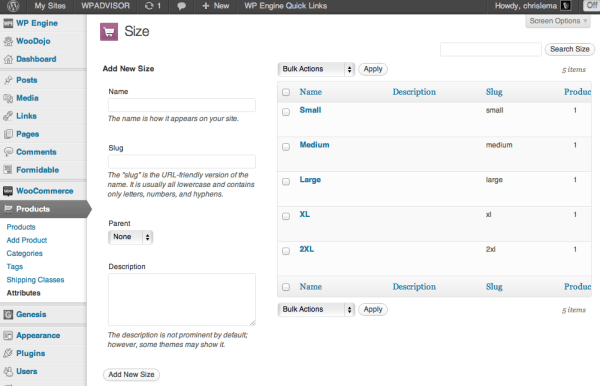
2. Next, click on “Configure terms” so that you can create all your options.
In this case, you'll add small, medium, large, XL and 2XL. And don't worry about the order that you create them. While you may not know it, you can change the order that appears in the drop down simply by dragging and dropping the term values on this page.
Adjust your Product
3. At this point, you need to go back into your product catalog, look for the product, and change the product type – in the Product Data section.
Instead of a simple product, you're going to want to change it to a “Variable product”. This will allow you to manipulate the data in the attributes and variations tabs.
4. Go to the Attributes tab and next to the blue “add” button, pick the attribute you created and then click add.
If you do this right, you'll see it appear in that section.
Configure your Variations
Here's where we get to the good stuff.
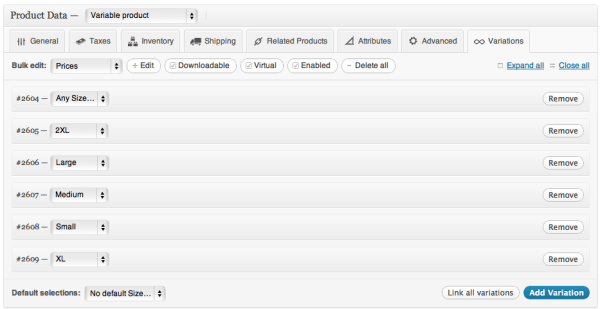
5. Click on the Variations tab and start adding variations (by clicking on “Add Variation”).
You can ignore the top row, where it says “bulk edit:”, for now. Just don't worry about it. If you only have one variable, like “size” you can also short cut the process by clicking on “Link all variations”. But if you have a lot of variables, you don't want to click this.
At this point you're almost done! What you see is each variation (the instance) that is mapped to your product. This is where you want to manipulate pricing. But where? It's a little deceiving because it looks like your only option is to change the value in the drop down or click remove. One sec…here's your next step.
6. Click on the bar, and a panel will appear.
And that's where you can pick the row/panel that you care about.
7. Now look for the price field and you can change it. You're done!
Did it work?
If you followed the 7 simple steps, you should have the basics of WooCommerce variable pricing down. If it didn't work, make sure you've followed each step. I did run across a situation this week where a plugin with it's own javascript was creating a collision with WooCommerce, which had an impact on the product page. The “add to cart” button doesn't appear until you've made a selection from the drop down. If you don't see that happen, turn off your plugins and re-activate them one by one until you find the culprit.


